Up next in 10

Halloween at Home
Show More Show Less View Video Transcript
0:00
Trick-or-treat, y'all
0:02
I'm Paula Deen, and I'm so glad you've dropped by because Halloween is my absolute favorite food holiday
0:10
But before I show you the tricks to my treat, we'll visit a man who takes his haunted house to New Heights
0:17
Then we're gonna head home to Scarborough Witch's Hat Cake. That'll be the hit of the party
0:22
And I've got these charming little cheeseball goblins and finally a Halloween treat that'll bite you right back
0:29
So light your jack-o'-lanterns and borrow your black cat, because it's fright night
0:34
Hee, hee, hee, hee, hee, hee, hee, hee, hee. Hey, this is the most fun time of year
1:16
It's Halloween. And I'm fixing to take y'all to a spooky, spooky castle
1:24
and I'm going to introduce you to Mr. Halloween. So kids, y'all load up and come with me, cause we're gonna have fun
1:33
He he he he he. My friend Peter over at Wings Castle has been scaring the britches off of people for years with his spooky decorations
1:47
And today he's offered to show me around his castle to help me get in the Halloween spirit
1:54
Hey Peter, how are you? Hey, Paula, how are you? I'm fine. How are you doing
1:59
I'm fine. I'm just feeding the fish. Were you all geared up and ready for Halloween? Yes, yes, we're getting there if you want to come in
2:04
I do want to come in, but I have to tell you, I'm kind of a little scared
2:09
Well, nothing to fear but fear itself. Spectacular. How long have you lived here
2:16
33 years now. How much in? Well, welcome to the castle. It's awesome
2:27
And how long did it take you to build it? Well, we're still working on it, so..
2:31
33 years later. Well, y'all have done a spectacular job with it
2:36
Thank you. It's almost indescribable. We have some surprises for guests if they show up
2:42
Oh, really? Especially if they like to look in the closet. Ah
2:48
Oh, it's a dead person, Peter! It's my neighbor. We got along fine now
2:54
Best neighbor you ever had. Yeah. Oh, Peter, I've had such a good time today with you
3:00
Okay. No, you're welcome. Here's a little souvenir. Oh, good. You're going to give me a rubber chicken
3:06
Yeah. That's great. I'm going to hang him in the kitchen. Okay. Oh, thanks so much, Peter
3:13
Bye. Happy Halloween. Same to you. Now that I'm good and scared
3:22
what y'all say let's go back to the house and fix up some Halloween treats? Well, how did you like Peter's castle
3:29
It was spooky, wasn't it? And he gave me a chicken. You know what I'm going to do with him
3:36
I'm going to just hang him right up here until it's time to fry him. He'll be safe right there
3:46
Today's show is all about Halloween props. Now, I've just draped a regular cake plate
3:54
and we're gonna put the wax paper around so I won't get that messed up
4:01
Now, right over here next to me, I have just a box cake mix, one round and one square
4:08
What I've done with this one is I've mixed red food coloring into yellow to get kind of an orange cake
4:14
So we're gonna start by placing our round layer into the center of our dish
4:21
We're going to take our square piece, and we're going to make this just a little more even by t the little puffy part off
4:34
I'm going to flip him like that, so we'll have a smooth edge to work with
4:40
Okay, so we're going to press down, and then pull those edges around, so we can just pull him right on out
4:51
Alright, that's going to be part of our hat. Then we're going to go over to here with this one
5:00
We're just going to push straight down and pull away. Straight down and pull away Alright now we got some scraps left This is going to be the top of the hat And I going to take these scraps and stuff them down into that cone
5:23
There we go, we're going to kind of press it in like that and set him right there. So
5:32
So we're going to use a canned frosting. Get a little start right there
5:40
We're going to spread him in and the kids are just going to love this hat
5:48
We're ready for our next layer. And place him right about in the center
5:55
And we're going to do the same thing again with him. Just going to smooth that around
6:06
Okay. We're going to do the same thing for our next layer
6:11
because we're getting the height for our hat. One more, last piece
6:19
Now I'm going to use a wooden skewer to make sure our hat doesn't fall off of our plate during the party
6:27
All right, so we're going to go in just like so, just like that
6:36
All right, now we're ever so gently going to try to get the frosting on to the top of
6:45
our hat without knocking it down. That may be the trick. So we're going to just start up there and very, very gently bring it down
7:05
Just like that. And he kind of fell on us, so I'm going to turn that around and bring it up to the top like that
7:16
Now we're ready to turn him and do a little bit more
7:21
I came from top to bottom on that first one, but I think I'm gonna try it from the bottom up
7:26
and let's see what we've got. I almost think that's gonna work better
7:32
So we're gonna start down there, bring that up. Just like that and see what we've got
7:41
Oh, I think that's much better, don't y'all? I'm gonna take my spatula now and just start smoothing it out
7:50
Look how cute our hat's starting to come alive, isn't it? I'm gonna go around the edge of the hat
8:01
Now, no self-respecting witch hat would go without a band, so that's what we're gonna put on next
8:07
And this is real, real easy to do. You can buy fruit roll-ups at the grocery store
8:12
store and you can cut them to the length that you need and take a paintbrush and
8:18
brush it with some white K-Rose syrup but I've made mine out of almond paste
8:24
So cute. All right now I've got a tray full of candy that Michael put out for me
8:30
and I'm gonna just start placing those candies. All right stick different
8:39
candies in our hat. You know, I don't want to do too much to it, because I think it's
8:47
just kind of so cute the way it is. I'm going to clean my knife up so that we can brace
8:55
our cake as we slip out our wax paper. Coming up next, Kitty. Cheeseball goblins
9:07
We're going to move on next to a cheese ball goblin
9:27
Great little dish because you can make this the night before and have him right ready for the party
9:33
And I'm going to use softened cream cheese, butter, And we're gonna use about a tablespoon of milk
9:43
That'll just help it make it more workable for us. All right, we've got our cream cheese
9:53
and our butter incorporated. So now we're gonna add Mexican cheese. And you can find this already shredded
10:03
in the cheese section of your grocery store. And I'm gonna let him sit as long as I can
10:12
Now I've got another one in the refrigerator because for my party I'm probably gonna be
10:17
making three of these to last all night Get this one out of the fridge And it should be nice and firm
10:32
And I've got my wax paper hanging right here ready. I'm just going to start playing until
10:47
I have the shape head that I want. All right, I think he's just about perfect
10:55
Set him right in the center of our plate. Over here, I have a bowl of beaten cream cheese
11:04
It has no flavoring or anything in it. And we're gonna frost our goblin
11:09
with the plain cream cheese. So you can see how smooth and soft this is
11:14
and I beat it real well, so it's ready to frost our head
11:21
Now you could have the inside of this goblin any color that you wanted
11:26
So here comes the fun part. We're gonna start with some ears
11:30
And by just lightly tinting a regular tortilla chip, green is gonna make him some fabulous big-o ears
11:42
We're just going to stick that ear right in there. Alright, how's that looking
11:49
The next thing we're going to do is his eyebrows. I could actually use the red bell pepper or the green
11:57
Alright, so how's that for his eyebrows? And another eyebrow
12:08
For his eyes, we're going to use a small pimento olive. And his nose, which is my favorite, find an ugly, ugly pepper
12:21
And these are just salad peppers, and I kind of like that one
12:27
That looking good? All right, we're going to use carrots for his teeth
12:33
And you see, he hadn't done too much brushing on them. Now, for Veet, we're gonna use a big olive
12:41
And for his toenails, I've got some beautiful red bell pepper. Now, isn't that a beautiful manicure
12:51
We're just gonna tuck them right in there. And I think we're gonna give him three toes
12:59
Now, I think it's safe at this point to start slipping our paper away
13:07
And now he's got to have a real pretty do by using just shredded purple cabbage
13:17
So how's that for a good-looking goblin? A few crackers. Look at that
13:24
He's all ready for the party. And next, we're going to see what's slithering through the grass
13:32
So don't go away. I promised y'all that I was going to make you something that slivered through the grass
13:56
Well, that's what we're fixing to make next. We're going to bake a snake
14:01
Now, this is just an ordinary canned crescent roll that we're going to start with
14:07
which makes it real easy. I'm going to put a little flour on our board
14:13
because we don't want it sticking, but not too, too much because I don't want it so dry
14:21
that I can't seal those perforated edges. I'm going to just press them together
14:27
so our snake won't have any holes in him. But I think we've got those looking pretty good
14:33
Okay, we're gonna take our flour and dust our rolling pin. Roll him long ways and try to get as much length
14:48
out of this piece of dough as we can. Right, there we go
14:53
We got a pretty good looking snake going on. Right now I'm just gonna use a mustard
15:01
and I'm using kind of a spicy mustard. I'm just gonna spread this on
15:08
Now you can use any kind of meat you want. I'm using a salami, love salami
15:14
and I'm just gonna line them up just like that down the middle
15:20
until I get to the end of the pastry. And then I'm gonna come in with some real thin ham
15:29
Lay it like that All right now we gonna add some cheese and you can add any kind of cheese you want I using a little jack I like a white cheese with our snake And we going
15:49
to fold that over, and fold this over, and I'm going to take our brush, and we're just
15:59
going to dampen that edge just like that so that we can seal him up. Okay, now I'm going
16:09
to flip him one more time. I'm going to kind of roll him up together kind of tight and
16:15
I'm going to work him so he keeps getting a little longer and a little longer and then
16:21
I'm going to taper out the tail. Just make him as pointed as you can down there. All
16:28
Now we're gonna come back and work on his head. Not a big one, but just a little head
16:34
All right, bathe him in an egg bath. This is gonna give the skin of the snake
16:42
a real shiny, pretty finish. All right, now we're gonna paint our snake
16:50
Just use food coloring that's been beat up with a little yolk, and you'll want it
16:57
To kind of run down the sides like that, kids can use their imagination and the future artist
17:04
will just have a ball playing with this one. So I'm going to give his head a little brown color
17:11
Then kind of blend it in there with the rest of him
17:15
Like that. All we have to do now is put two cloves in for his nostril
17:24
we're gonna transfer him to the cookie sheet. Get him slithering up there onto that pan
17:39
Does he look pretty good? Okay. All right, here he goes into the oven
17:52
And let's go see what the other one looks like. I put one in a little bit earlier
17:59
and let's see what he looks like. He looks pretty good, doesn't he
18:11
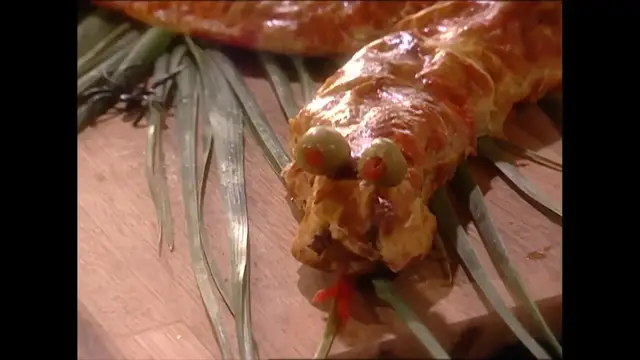
And we're gonna stick that red bell pepper tongue in there. Just like that
18:21
Now all we need to add is the eyes. How do you like that
18:33
I'm just going to bite him before he bites me first. And he really is a tasty snake
18:43
Stay tuned, because coming up next, a few more tips to make it real scary
18:54
While I was putting this menu together, I thought of a few things that y'all just might
19:10
like to know in case y'all want to make it. Now, a great way to be able to do the vegetables to your goblin the night before is shave your
19:19
cabbage and your carrots and your bell peppers and put them in ice water
19:24
and the next morning he will have the prettiest, curliest hairdo you've ever seen
19:30
And I think the best tip I got is the one that Peter gave me
19:36
He told me to take a rubber glove and fill it full of punch
19:44
Look at it. Tie it up with a twist tie. You'll want to tie that tightly
19:57
Throw it into your freezer. And when you're ready to pour your punch into your punch bowl, your hand makes your ice cube
20:14
I hope that all your little ghosting goblins love the menu that you prepare for them
20:20
the cream cheese goblins, and the witch's hat, and the snake. So until next time, America, I wish you love and best dishes from my Halloween to yours
20:35
He he he he he he he he he he he
Food & Drink